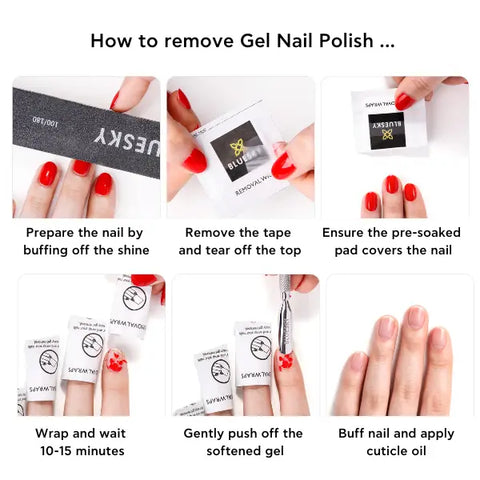
Gel nail polish has become the popular choice for those wanting a long-lasting, chip-resistant manicure. When it comes to time for removal, many of us dread the thought of damaging our nails. Fear not! In this blog post, we will walk you through the step-by-step process to effectively remove gel nail polish at home, without causing any harm to your nails, to ensure a smooth and damage-free experience.
Step 1: Gather your tools
Get together everything you need before diving into the removal process. You’ll need:
- Nail Buffer
- Nail File
- Wooden Cuticle Sticks or a Cuticle Pusher
- Removal Foils
- Acetone Gel Nail Polish Remover
- Or skip the foils and remover and use Bluesky’s Remover Wraps
- Cuticle Oil

Step 2: Prepare your nails
Just like your pre-manicure prep, gel removal prep is just as important. Take a fine Nail File or Nail Buffer and gently buff the the top layer of your gel polish off to remove the shine from the gel. This helps to break the Top Coat seal and allows the acetone to penetrate the gel polish more effectively. Be careful not to buff too aggressively to avoid damaging your natural nails.
Step 3: Soak your nails
You can either use Acetone Remover for Gel Nails and Removal Foils or Pre-Soaked Gel Nail Remover Wraps to remove your gel polish.
If you’re using Acetone and Foils, soak the pad in acetone then place the pad on top of your nail ensuring it covers the entire surface of the gel polish. Secure it in place by wrapping the foil around the finger. The foil creates a barrier to prevent the acetone from evaporating quickly. Leave the wraps on for 10-15 minutes to allow the gel polish to soften.
Alternatively, use the pre-soaked Bluesky’s Remover Wraps for added convenience. It’s a very similar process.
Top Tip: It’s easier to do one hand at a time! Remove all the gel from one hand first then repeat the process for your other hand.
Step 4: Remove the foil
After soaking for 10-15 minutes, carefully slide off the foil or Remover Wraps. Use a Wooden Cuticle Stick or Cuticle Pusher to gently push off the softened gel. If any stubborn spots remain, resist the urge to force them off. Instead, re-wrap the nail and let it soak for a few more minutes before attempting to remove the remaining gel polish.
Step 5: Buff the nail
Once you have removed the gel, gently buff your nails to remove any final residue. Then take your Nail File and gently shape your nails before washing them to remove all traces of acetone.
Step 6: Nourish your hands and nails
After successfully removing the gel polish, it is essential to hydrate and nourish your hands and nails. Apply a generous amount of Cuticle Oil to replenish moisture and promote nail health, followed by an indulgent layer of Hand Cream to soothe and hydrate your skin.

You're all done!
By following these simple steps, you can safely and effectively take off gel nails at home without causing any harm to your natural nails. If you remember to prioritise gentle techniques, take your time and pamper your nails with the right products to maintain their health and beauty, you will leave your nails fresh, clean, healthy and ready for their next stunning manicure.
Home gel polish removal saves you time and money and with the right supplies and techniques you can enjoy a salon-quality manicure without leaving the comfort of your own home.
Other suggested products:


