
Are you ready to bid farewell to your nail extensions? Removing nail extension products, including Builder Gel, Gum Gel, Fast & Easy Builder Gel, Lexan Gel and Soft Gel Tips, might seem like a daunting task, but fear not! In this comprehensive guide, we'll walk you through the step-by-step process of safely and effectively removing various types of nail extensions. Whether you're a DIY enthusiast or a salon-goer, these tips will ensure a swift and damage-free removal.
Step 1: Prepare your supplies
Before you start the removal process, it’s essential to gather all the necessary supplies. You’ll need:
- Nail Buffer
- Nail File
- Wooden Cuticle Sticks or a Cuticle Pusher
- Removal Foils
- Acetone Gel Nail Polish Remover
- Or skip the foils and remover and use Bluesky’s Remover Wraps
- Cuticle Oil
Step 2: Prepare your nails
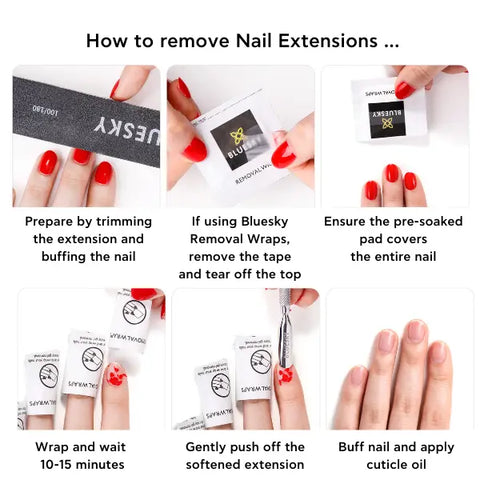
Begin by trimming your nail extensions to a manageable length using nail clippers. Next, use a nail file or buffer to gently remove the top layer of the gel polish. This step helps the acetone penetrate the nail extensions more effectively, making the removal process quicker.
Step 3: Soak your nails
You can either use Acetone Remover for Gel Nails and Removal Foils or Pre-Soaked Gel Nail Remover Wraps to remove your gel nail extensions.
If you’re using Acetone and Foils, soak the pad in acetone then place the pad on top of your nail ensuring it covers the entire surface of the extension. Secure it in place by wrapping the foil around the finger. The foil creates a barrier to prevent the acetone from evaporating quickly. Leave the wraps on for 10-15 minutes to allow the nail extensions to soften.
Alternatively, use the pre-soaked Bluesky’s Remover Wraps for added convenience and watch our ‘How To’ video below. It’s a very similar process.
Top Tip: It’s easier to do one hand at a time! Remove all the product from one hand first then repeat the process for your other hand.
Step 4: Remove the foil
After soaking for 10-15 minutes, carefully slide off the foil or Remover Wraps. Use a Wooden Cuticle Stick or Cuticle Pusher to gently push off the softened nail extension. If any stubborn areas remain stuck, resist the urge to force them off. Instead, re-wrap the nail and let it soak for a few more minutes before attempting to remove the remaining extensions.
Step 5: Buff the nail
Once you have removed the extension, gently buff your nails to remove any final residue. Then take your Nail File and gently shape your nails before washing them to remove all traces of acetone.
Step 6: Nourish your hands and nails
After successfully removing the nail extension, it is essential to hydrate and nourish your hands and nails. Apply a generous amount of Cuticle Oil to replenish moisture and promote nail health, followed by an indulgent layer of Hand Cream to soothe and hydrate your skin.
By following these simple steps, you can safely and effectively take off gel nail extensions at home without causing any harm to your natural nails. If you remember to prioritise gentle techniques, take your time and pamper your nails with the right products to maintain their health and beauty, you will leave your nails fresh, clean, healthy and ready for their next stunning manicure.
Home gel polish and nail extension removal saves you time and money and with the right supplies and techniques you can enjoy a salon-quality manicure without leaving the comfort of your own home.
Other suggested products: